Category: Vintage radio

  • BC455 SCR274

    BC455 after restoration with aftermarket knob

    A little update

    This is the first actual blog post to the website. The others were older articles that i wrote up to a year ago.

    Article:

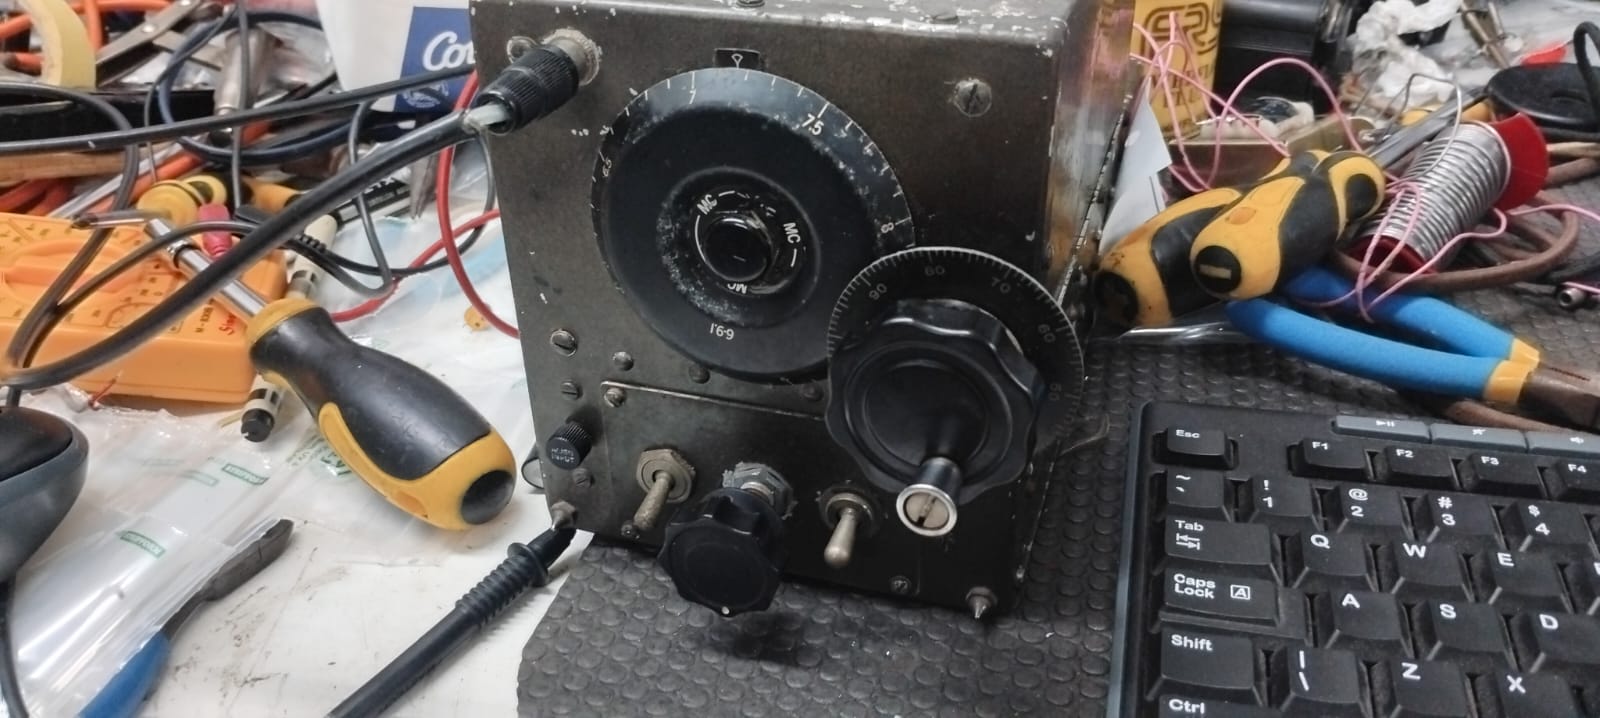
    I got this receiver a while back from a guy up north. I got this BC455, its accompanying transmitter, and a modulator unit for the transmitter. Those other two will be covered in a future post. They are all part of the SCR274 command set (also known as the ARC5 command set)

    When I received the radio it was in pretty decent condition compared to the other parts of the SCR274 set I have so far.

    I also got hold of dynamotor for the receiver (not the original type but still the correct voltage) from John ZS1WJ. That worked when i received it. I tested all the valves in the BC455 with my vintage valve tester and they all tested good. The BC455 had been re-wired to 12V on the filaments instead of 24V, which suited my dynamotor just fine since it also required 12V instead of 24V.

    Dynamotor Western electric PS-225

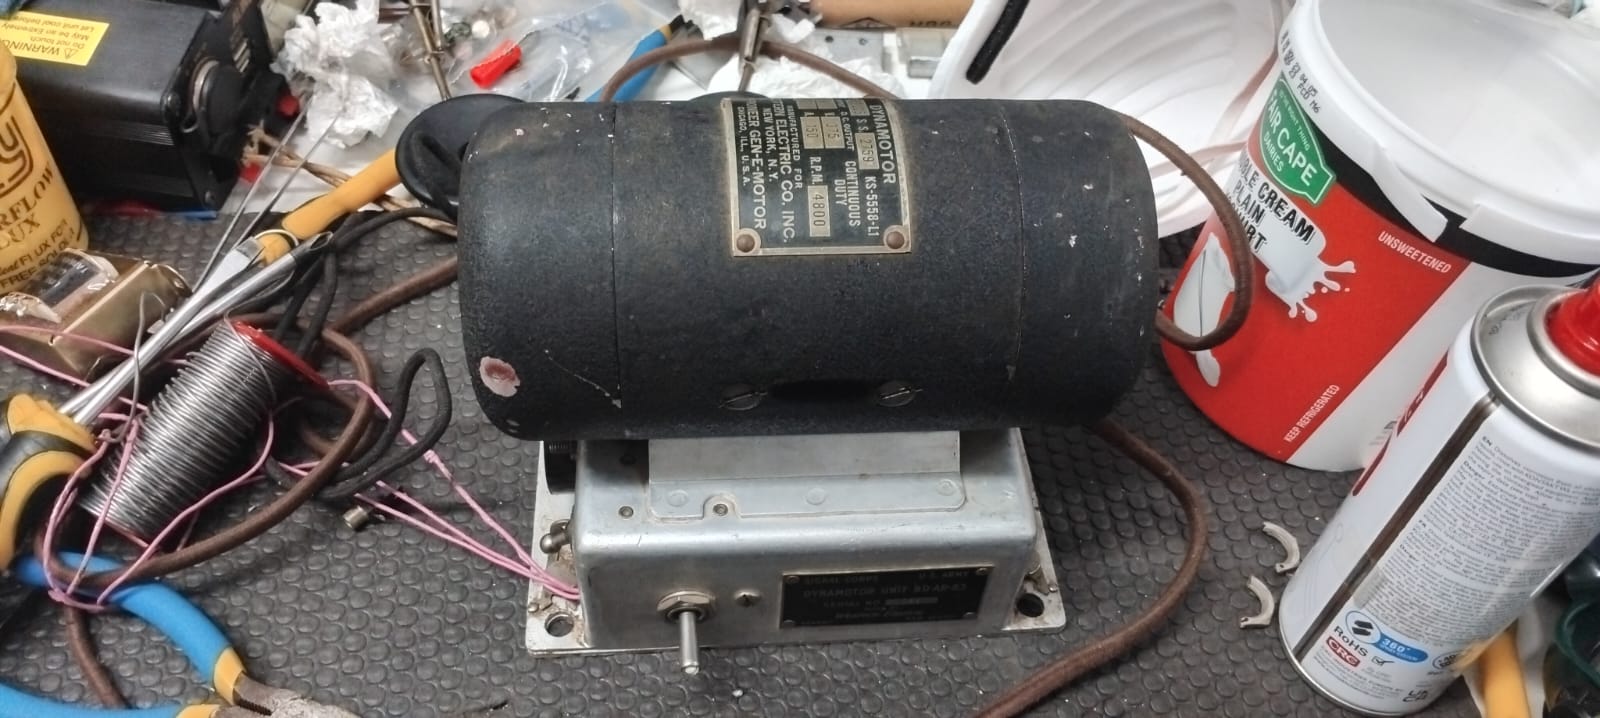
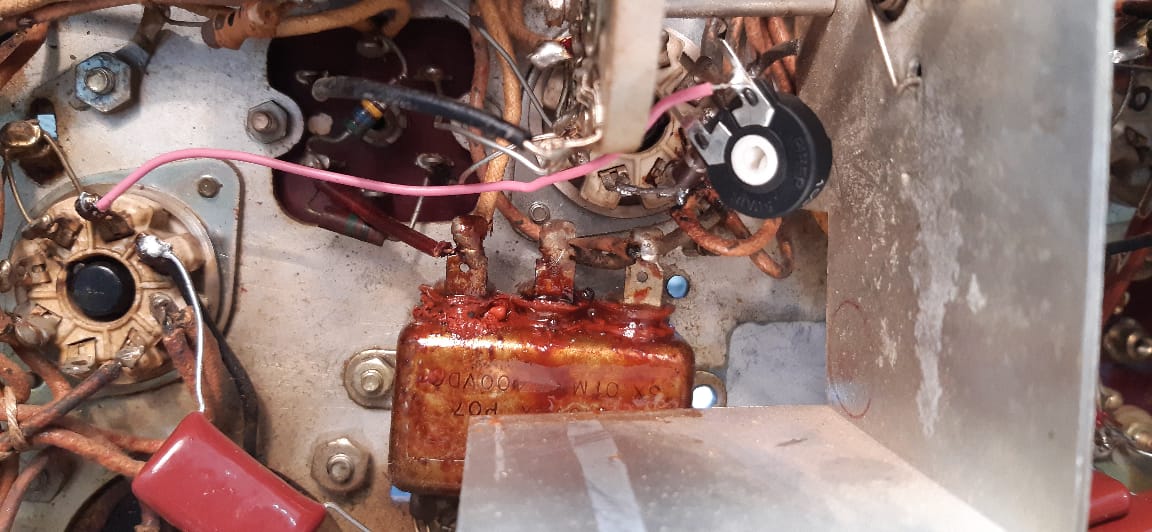
    I wired up the BC455 to the dynamotor and gave it power from my 13.8V 30A psu (13.8V is close enough to 12V that it works fine). Turns out that the dynamotor chassis is connected to +375V and the “HV out” is actually the ground of the dynamotor. This means that I gave the BC455 -375V which caused the smoothing capacitor inside to let the magic smoke out.

    A pool of “liquid” came out of the capacitor and went on the mat that i was working on. Later I found out that this was the highly toxic PCB oil (Polychlorinated Biphenyl oil). I wiped it up, clipped the lead that went to the capacitor so that I wouldn’t effect the operation of the rig. I then corrected the wiring of the rig so that there was +375V on the HV in on the receiver and the ground was actually grounded. I gave it power and hooked up a speaker to it and heard some noise.

    I then used my TinySA spectrum analyzer to generate a signal and feed it into the antenna input of the receiver. I tuned the signal in with the help of a oscilloscope on the audio output since the audio was extremely soft. It worked perfectly. I ended up replacing the audio transformer with a different one that gave much less distortion and more volume.

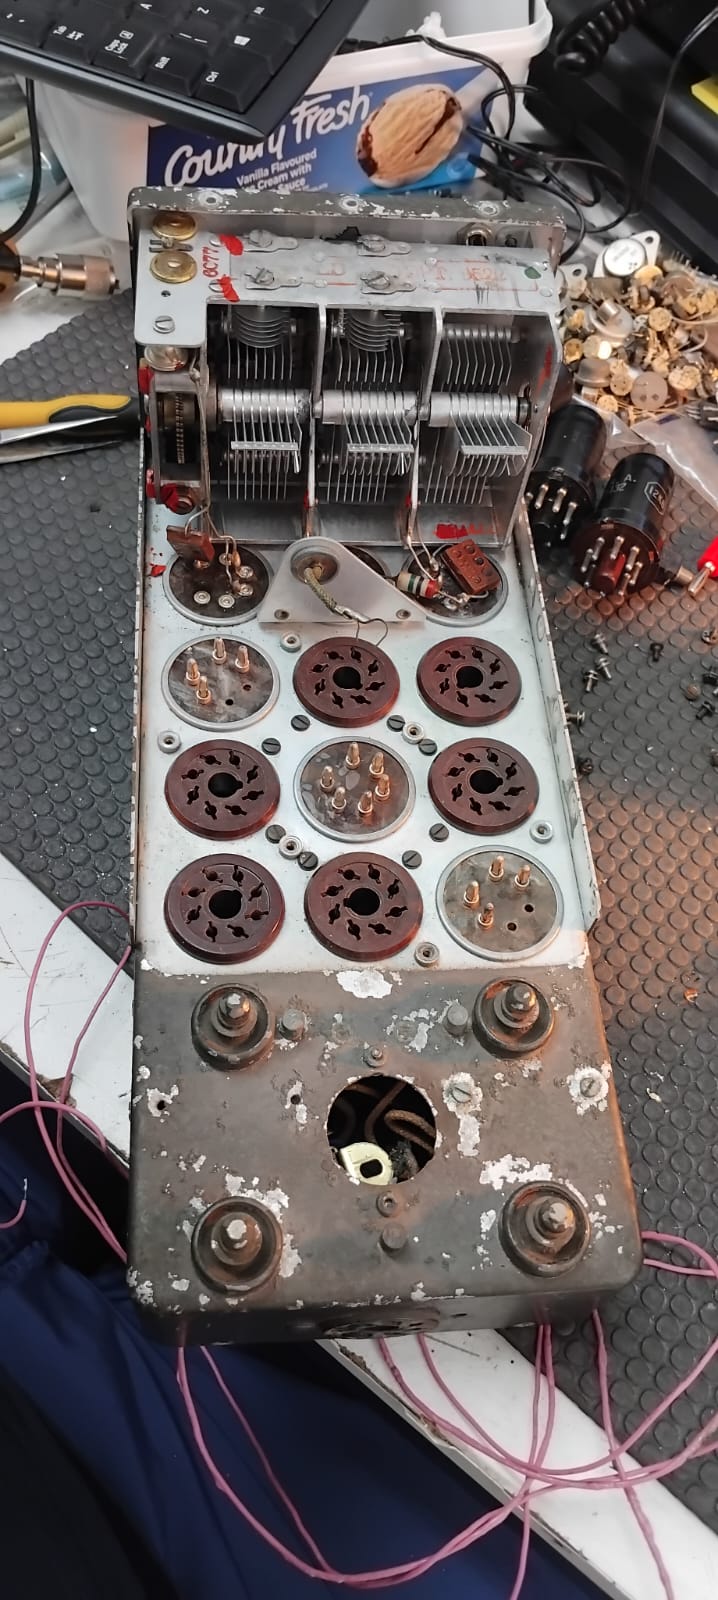
    There was one more issue: there was no way to add a knob to the since it was designed to be remote controlled via a wire that physically attached to the gearbox. I removed all the valves, the IF boxes and the gearbox to get to the back of the connector (both the valves and the if boxed are socket-ed which is great). I had to cut the connector bit off since it was screwed on and then two pins were put in so that it couldn’t unscrew. After I had done that I just added a knob and all worked well.

    The top is the chassis striped
  • FLDX400 and FRDX400 repair:

    I got this set of radios from Charl ZS1ZZ sometime near the end of 2024. They are all-vacuum tube radios from the 1960’s. They both somewhat worked when I plugged them into my current limiter, but not fully. The receiver (FRDX400) only received on some bands, and not very well on the ones that it did work on. The transmitter (FLDX400) didn’t work on any band but did turn on. I first gave both radios a thorough clean and sanded the rust off of the panels. I checked all the valves in both radio and they all looked fine. All of the valve filaments turned on in both radios. I then sprayed contact cleaner into all of the potentiometers and switched I could find on the radio. After cleaning the receiver all of the bands sprung back to life, but it still didn’t work very well. It wasn’t as sensitive as it was spec ’ed to be. I ran through the alignment procedure from the service manual and re-aligned the rf and if sections. It then worked perfectly on all bands and had a sensitivity of 0.5uV.

    I then had a look at the transmitter. I pulled out the finals and checked them for shorts. They were fine. I then measured the plate voltage on the finals and that was also good. Since the voltages on the finals looked OK, I started signal tracing the rig. I lost the signal after the 1st mixer. It took me ages to work out that the mixer balance potentiometer wasn’t making good contact. I had missed it with the contact cleaner earlier on when I was cleaning. I sprayed contact cleaner into and re-balanced the mixer and it started transmitting. I also performed a full alignment on the transmitter, and it works perfectly now.

    I plan for these radios to be paired with my linear amplifier when its all set up, or my fl-101 and fr-101 set (or possibly my ft901d), I am not quite sure yet.

  • AR-88 restoration

    A little history

    Inside the cabinet

    The AR-88 was a listening post receiver used during WW2 to listen to German radio communications. It was made by RCA for the war effort. The designers of the radio were told “to pull all the stops out” and the budget for the research and design for this radio was enormous. The result is a radio that is stable and is still more sensitive than a large amount of modern receivers. 

    The repair:

    The repair I did on my AR-88 was preventative maintenance (as well as adding the meter circuit). The first step was to get the nearly 50kg rig onto the floor and take it out of its case. It slides out on two rails which would have usually worked well except, thanks to the age of the rig, they were covered in rust and didn’t run smoothly. After I got the rig out of the case, I sprayed WD40 on the rails and cleaned the rust off which worked great. 

    I then put the radio onto my bench with the help of my parents and started cleaning it. After getting the dust off of it, I desoldered the wires going to the chokes and cleaned the leaking oil off of the chassis and chokes. The oil came from the chokes since when they had gotten hot, the oil inside had liquified and leaked out. This problem would be resolved later when I replaced the capacitors with better ones reducing the load on the choke. 

    After doing all the major cleaning I removed the knobs and the front panel and cleaned it up with Handy Andy and soapy water (be careful with leaving the Handy Andy on for too long, it can damage the paint!). While carrying the front panel back to the garage I fell down the stairs and the mechanical dial lock broke as I dropped the roughly 10kg steel plate on the floor (it’s about a cm thick). The front panel wasn’t damaged besides the dial lock screw which I am going to re-make on a lathe when I get access to one. 

    After the cleaning process, I started work on replacing old degrading components (the radio is around 80 years old and so are the components). I replaced the PCB-filled tub capacitors (PCB oil is carcinogenic and the seals on the capacitor tubs are rubber and have degraded and leak). There are six of them in the AR-88 all of which have to be replaced. It is EXTREMELY important to wear gloves while handling them. There is another oil-filled capacitor bank which I left in there because it was in great condition and wasn’t leaking (and wasn’t full of PCB oil). I replaced the tub capacitors with foil capacitors which worked great. The filament voltage dropping resistors (100ohms and 150ohms at 10w) were corroded and were replaced. A few resistors and micamold capacitors (cheaper, slightly worse mica capacitors) around the rig replaced. There is a capacitor that couples the audio out of the audio output section into the audio transformer. If this capacitor fails as a short, it puts B+ on one side of the transformer and ground on the other side blowing up the rare audio transformer. It’s extremely important to replace. 

    Bathtub Capacitor

    After having replaced all the old components that were degrading or prone to failure, I started work on the meter circuit. During war time production, there was a shortage of signal strength meters and as a result they just put a cover over the hole where the meter went. My AR-88 came with a meter installed and the wiring for the meter in the lacing, but both sides of the meter grounded. I still haven’t found out why since the wiring and meter are definitely factory original, but the rest of the meter circuitry wasn’t there (a potentiometer, a resistor and a capacitor). I have no idea how this happened… 

    After installing the meter and calibrating it by getting the needle all the way to the left with the antenna input shorted (the meter’s mechanical zero set to the right instead of the normal left). I then performed a full alignment. 

    The electrical restoration is complete and all that needs to be done is to re-machine the dial lock knob and paint it.